 Zipabill
How to Create an Invoice: A Simple Step-by-Step Guide
Create a clear, professional invoice without overcomplicating it. Here is what to include, how to format it, and how to send it to a client.
To create an invoice, you need to identify your business and client, describe the work you completed, show how much is owed, set a payment deadline, and explain how the client can pay you.
That is the basic idea.
A good invoice does not need to be complicated. It needs to answer a few important questions clearly: Who is charging? Who is being charged? What are they paying for? How much do they owe? When is payment due? How should they pay?
If you are creating an invoice for the first time, this guide will walk you through each part and show you what a finished professional invoice can look like.
What Is an Invoice?
An invoice is a document you send to a client or customer requesting payment for products or services you have provided.
It normally records the transaction before payment is completed and gives the client the information they need to pay you correctly.
For example, imagine you are a freelance designer who created a logo for a client. Your invoice might show your name or business name, the client's details, the logo design service you provided, the agreed price, the date the invoice was issued, when payment is due, and how the client should pay you.
An invoice also creates a useful record for both you and your client. Instead of relying on chat messages, emails, or memory to work out what was agreed, the important billing information sits in one document.
What Should an Invoice Include?
A professional invoice should make it easy for your client to understand exactly what they are paying for.
The precise information legally required on an invoice can vary depending on your country, business structure, industry, and tax obligations. Check any local invoicing or tax requirements that apply to your business.
Your name or business name
Put your name, trading name, or registered business name somewhere easy to see. If you have a logo, you can include it too, but a logo is not what makes an invoice professional. Clear information matters more.
Your contact information
Include the contact details your client may need, such as your email address, phone number, business address, or website. You do not necessarily need every possible contact detail. Include the information that is relevant to how you operate and any information required in your jurisdiction.
Your client's information
Add the name of the person or company you are invoicing. Depending on the situation, this may include the client or company name, billing address, contact person, and email address. Double-check the spelling before sending the invoice.
An invoice number
Each invoice should have a unique number that helps you identify and track it. You could use a simple sequence such as INV-001, INV-002, INV-003. Your numbering system does not need to be complicated. It simply needs to stay consistent enough for you to find an invoice later.
Invoice date and payment due date
The invoice date is the date you issue the invoice. The due date tells the client when payment is expected. Instead of writing only “Pay soon,” use an actual date where possible. If you and the client already agreed on payment terms, your invoice should reflect those terms.
Description of the work
Describe what you are charging for in language the client will immediately understand. “Services — $500” is vague. “Homepage and five-page website copywriting — $500” is much clearer.
Quantity, hours, or units
For work priced by quantity or time, show how the total was calculated. For example, Social media graphics — 8 × $25 = $200 or Consulting — 5 hours × $40 = $200. If you agreed on one fixed project fee, you may only need one line item.
Price, subtotal, taxes, discounts, and total
Your client should be able to see how you reached the final amount. Show the subtotal and any applicable discounts or taxes, then make the final amount due obvious. If taxes apply to your transaction, show them appropriately according to the rules that apply to your business.
Payment terms and payment instructions
Payment terms explain when and under what conditions you expect to be paid. Your payment instructions tell the client how to pay you, such as by bank transfer, payment link, or another accepted method. Do not make your client hunt through an old conversation to work out where the money should go.
Quick checklist:
- Your name or business name
- Your contact information
- Client details
- Unique invoice number
- Invoice date and due date
- Products or services provided
- Rates, quantities, subtotal, discounts or taxes where relevant
- Total amount due
- Payment terms and payment instructions
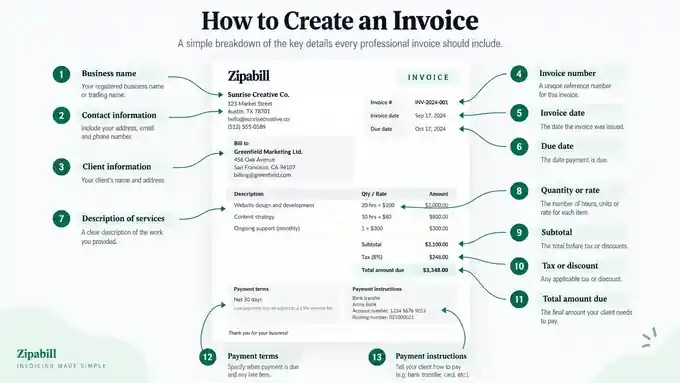
How to Create an Invoice Step by Step
If you are wondering how to make an invoice from scratch, use this process.
1. Start with a clean invoice format
You can create an invoice using a document editor, spreadsheet, template, or invoice generator. Whatever you choose, keep the layout easy to scan. Your client's attention should naturally move from your business information to the invoice details, work completed, total amount, due date, and payment instructions.
2. Add your business details
Enter your name or business name and the relevant contact information. If you invoice clients regularly, you should not have to reconstruct this information every time. Save it somewhere reliable or use an invoicing tool that can reuse your details.
3. Add the client's billing information
Enter the correct client name and any required business or billing details. For companies, confirm whether your contact person and billing department are the same. Some businesses have a separate person or email address that handles invoices.
4. Create an invoice number
Assign the invoice a unique identifier. A simple sequence works well. If your previous invoice was INV-014, the next one could be INV-015.
5. Add the invoice date and due date
Show when you issued the invoice and when payment should arrive. A specific date is clearer than relying on your client to calculate a deadline themselves.
6. List the products or services
Write down exactly what the client is being charged for. For each item, include the description and the relevant rate, price, hours, quantity, or project fee. Keep descriptions specific enough to be recognizable.
7. Calculate the total
Check your arithmetic carefully. Include the subtotal and any applicable discounts or taxes, then make the final amount due obvious. Your client should never need a calculator to work out what they owe you.
8. Add payment terms and instructions
Write the agreed payment deadline and explain how to make the payment. Only include information appropriate for the payment method you actually use.
9. Review the invoice before sending it
Before you send the invoice, check the client name, invoice number, dates, service descriptions, rates, calculations, total amount, currency, and payment information. A short review can save several emails later.
10. Send the invoice and keep a copy
Send the invoice through the communication channel you normally use for business, such as email or your invoicing system. Keep a copy of every invoice you issue so you can track what has been billed and what has been paid.
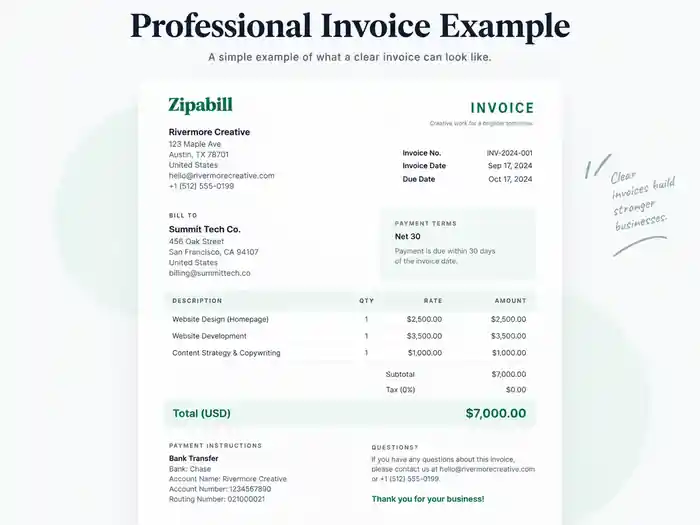
Professional Invoice Example
Here is a simple example of what a freelancer invoice could contain.
+234 XXX XXX XXXX
17 September 2026
Bill to
Brightline Media
Attn: Maya Okon
[email protected]
Payment due: 24 September 2026
Payment method: Bank transfer
The invoice is easy to understand because the client can immediately see who sent it, what they are paying for, how much they owe, and when the payment is expected. Your own invoice may contain more information depending on your work and local requirements, but the same principle applies: clarity first.
How to Invoice a Client as a Freelancer
Freelancing often makes invoicing feel informal because so much business happens through WhatsApp, email, Slack, Instagram, or quick calls. Your billing process should still be clear.
First, agree on your price and payment expectations before you begin the work whenever possible. Your invoice should confirm an agreement, not introduce a completely new one.
When the agreed milestone or project is complete, create the invoice promptly. Waiting several weeks to bill a client can make your own cash flow harder to manage.
Describe the work in terms the client recognizes. If they hired you for “September social content,” use that language rather than an internal description only you understand. Use a specific due date, and make the payment process obvious.
If a client opens your invoice and immediately has to ask, “Where do I send the money?”, the invoice is missing one of its most important jobs.
You should also maintain a consistent record of your invoices. If you invoice multiple clients, relying on message history becomes difficult quickly.
Common Invoice Mistakes to Avoid
A professional invoice is often more about avoiding confusion than creating something visually impressive.
- Missing the invoice number. Unique invoice numbers make bills easier to track and discuss.
- Using vague service descriptions. “Work completed” may make sense today, but it may not six months from now.
- Using the wrong client information. An incorrect company name or contact can slow down internal approval.
- Forgetting the due date. Your client needs to know when payment is expected.
- Leaving out payment instructions. Make the next step obvious.
- Incorrect totals. Always check the numbers before sending.
- Inconsistent records. Use a consistent numbering system and keep copies of the invoices you issue.
The Easier Way to Create an Invoice
You can build every invoice manually. But once you start billing clients regularly, repeatedly formatting documents, changing invoice numbers, copying client details, adding line items, calculating totals, and exporting files becomes administrative work of its own.
That is what an invoice generator is meant to simplify. Instead of thinking about the document layout every time, you enter the billing information and let the tool handle the invoice structure.
Zipabill's free invoice generator is coming soon
We are building a faster way to turn billing details into a professional invoice without starting from a blank document every time.
Join the waitlist for early accessFrequently Asked Questions
What should an invoice include?
An invoice normally includes your business information, client details, a unique invoice number, invoice and due dates, descriptions of the products or services provided, prices, the total amount due, payment terms, and payment instructions. Local requirements may require additional information.
Can I create an invoice myself?
Yes. You can make an invoice manually using a document or spreadsheet, start from a template, or use an invoice generator. Whichever method you choose, make sure the information is accurate, easy to understand, and appropriate for any rules that apply to your business.
How do freelancers create invoices?
Freelancers typically include their contact or business information, client details, a description of the work completed, the agreed price, invoice and due dates, payment terms, and instructions for payment. The invoice is then sent to the client and kept as part of the freelancer's billing records.
Does an invoice need an invoice number?
Using a unique invoice number is good practice because it makes invoices easier to identify, track, discuss, and organize. Specific invoicing requirements can vary by jurisdiction, so check the rules that apply to your business.
When should I send an invoice?
Send your invoice according to the payment arrangement you agreed with the client. That might be before work begins for a deposit, after a milestone, immediately after completion, or according to a recurring billing schedule.
What payment terms should I put on an invoice?
Use the payment terms you agreed with your client, such as payment by a particular date or within an agreed number of days. Avoid surprising a client with new terms only after the work has been completed.
How do I make an invoice look professional?
Use a clean layout, consistent formatting, accurate information, clear service descriptions, an obvious total, and straightforward payment instructions. A professional invoice does not need elaborate design. It needs to be easy to understand.
Creating an invoice should take less time than doing the work you are invoicing for. Once you know what belongs on the document, the process becomes straightforward: identify both parties, describe the work, calculate the amount, set the deadline, provide payment instructions, and send it.
You did the work. Billing it shouldn't be more work.